Author
Suzanne is an Owner/Designer
Author
Suzanne is an Owner/Designer
A guide to pantry cabinets and open kitchen storage that actually stays organized, broken down by zones, visibility levels, and the cabinet features worth investing in.
A guide to pantry cabinets and open kitchen storage that actually stays organized, broken down by zones, visibility levels, and the cabinet features worth investing in.
Pantry Cabinets and Built-In Storage: What to Include So Your Kitchen Looks Calm Every Day
*This blog contains affiliate links.
Are open shelves even storage?? I would argue no, they are now ways to create curated decor to show off your style. SO then where do the essentials go?? Lets dig in.
Open shelving became a styling moment. The pantry became a photo op. And somewhere in the middle of all that, the actual stuff, the cereal and the rice and the 4 half-used bags of chocolate chips, lost its home.
I think about kitchen storage the way I used to think about engineering systems. Inputs, outputs, flow. Where does the thing enter the kitchen, where does it get used, and where does it land when you're done. If you answer those three questions for every item category, you don't need a bigger kitchen. You need a smarter one.
---
Shop This Room
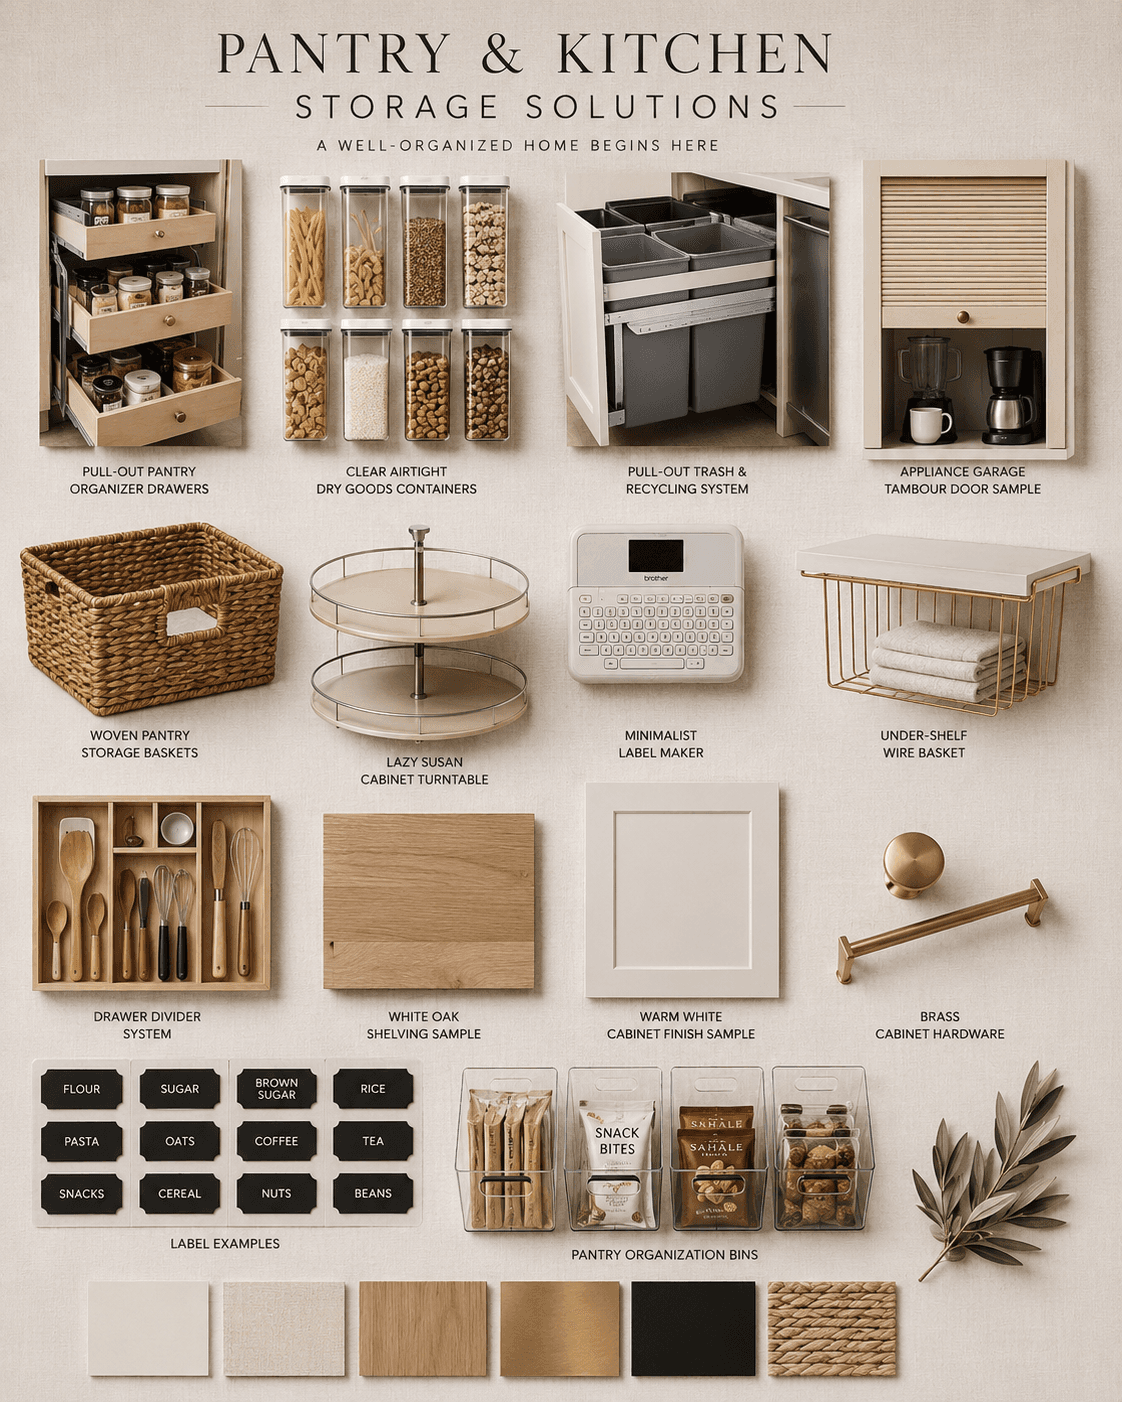
Here are the pieces that make this kind of storage actually work day to day:
---
The Cabinet Features That Actually Matter
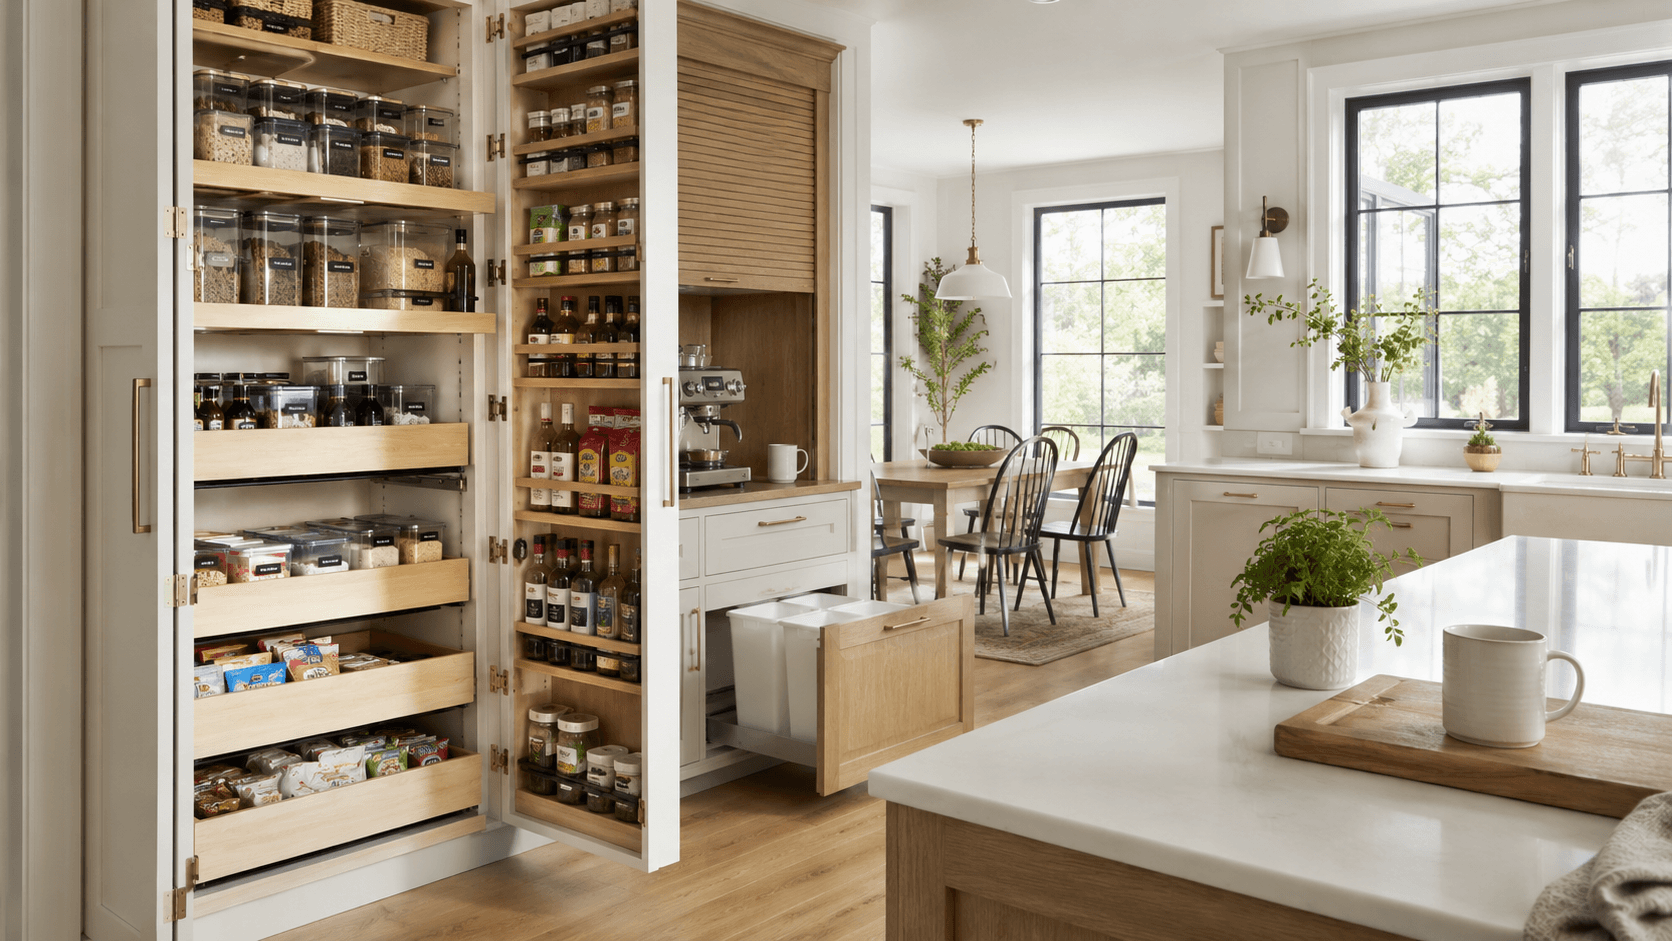
Not all pantry cabinets are doing the same job. A tall cabinet with fixed shelves is just a closet with better lighting. What makes a pantry cabinet functional is movement. Things that slide, rotate, and reveal.
Pull-out drawers. These are the single biggest upgrade you can make. A 24-inch deep cabinet with fixed shelves means everything behind the front row is forgotten. Pull-outs bring the back row to you. I recommend full-extension pull-out drawers rated for at least 50 pounds. You will load them heavier than you think.
Adjustable shelves. Sounds obvious, and honestly most cabinets technically have them. The issue is that most of us set the shelves once during move-in and never touch them again. Revisit the shelf height every season. Your storage needs shift. That top shelf holding nothing but a cake stand you use twice a year? Move it up 6 inches and you just created room for a whole new row.
Appliance garage. This is the section of counter-depth cabinetry with a retractable or flip-up door that hides your toaster, coffee maker, or stand mixer. The door is the key. If the appliances are sitting on the counter, they become visual clutter. If theyre in a cabinet you have to fully open and lift them out of, you stop using them. The appliance garage with a tambour door is the sweet spot. Open, use, close. Counter stays clean.
Trash and recycling pull-out. I have a strong opinion here. If your trash can is visible, your kitchen will never look calm. Ever. A dual-bin pull-out system tucked into a base cabinet near the sink is one of those invisible upgrades that changes the whole feeling of the room. You stop noticing the absence of mess, which is the point.

---
The Zone Map: Categories to Locations
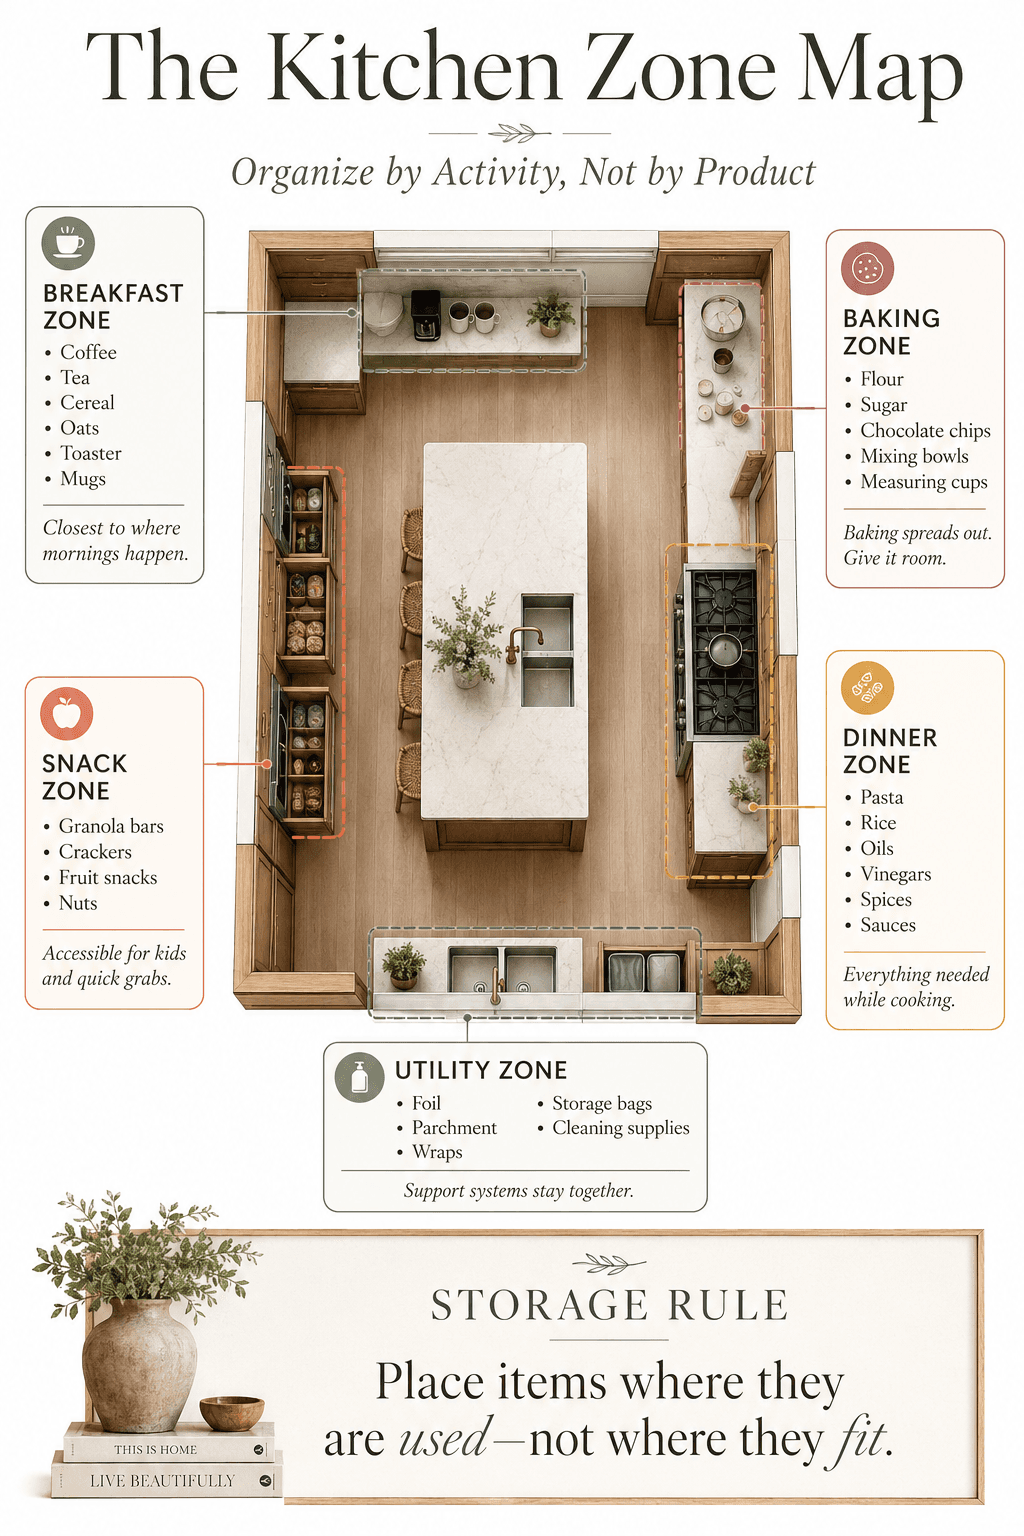
Here is where layout thinking really kicks in. Instead of organizing your pantry alphabetically or by container size, organize it by activity. Each zone maps to a moment in your day.
Breakfast Zone. Cereal, oats, coffee, tea, mugs, toaster. This zone should be closest to your coffee maker and the counter where you actually eat breakfast. If you eat at the island, the breakfast zone lives in the cabinets nearest the island. Not across the kitchen.
Snack Zone. Granola bars, crackers, dried fruit, kids snacks. This one is interesting because it needs to be accessible, sometimes by shorter humans. Lower drawers or a pull-out at waist height works. Woven baskets are great here because you can pull the whole basket out, set it on the counter, and let everyone grab what they need.
Baking Zone. Flour, sugar, baking soda, vanilla, chocolate chips, mixing bowls, measuring cups. This zone should be near your oven and your largest stretch of counter. Baking spreads out. It needs room. Store dry baking ingredients in airtight square containers because rounds waste shelf depth.
Dinner Zone. Pasta, rice, canned goods, oils, vinegar, spices, sauces. This is usually the biggest zone and the one closest to the stove. A turntable for oils and vinegars means you can spin to find what you need instead of moving 6 bottles to reach the one in the back.
Utility Zone. Wraps, bags, foil, parchment paper, cleaning supplies. These live in a drawer or lower cabinet, ideally near the trash pull-out. A drawer divider set keeps this from becoming the junk zone.
The real trick isn't just grouping things. Its placing the group in the right spot in the room relative to where the action happens. A baking zone next to the fridge and far from the oven is a baking zone you'll fight with every time.
---
This is exactly what I do for clients. Want me to design your room like this?
Check out out Room Systems Plan to get started. Or use our Style Discovery tool first if you're still figuring out your direction.
---
Visibility Rules: What Gets Shown vs. What Gets Hidden
This is the part everyone skips, and its the reason most organized kitchens fall apart within a month.
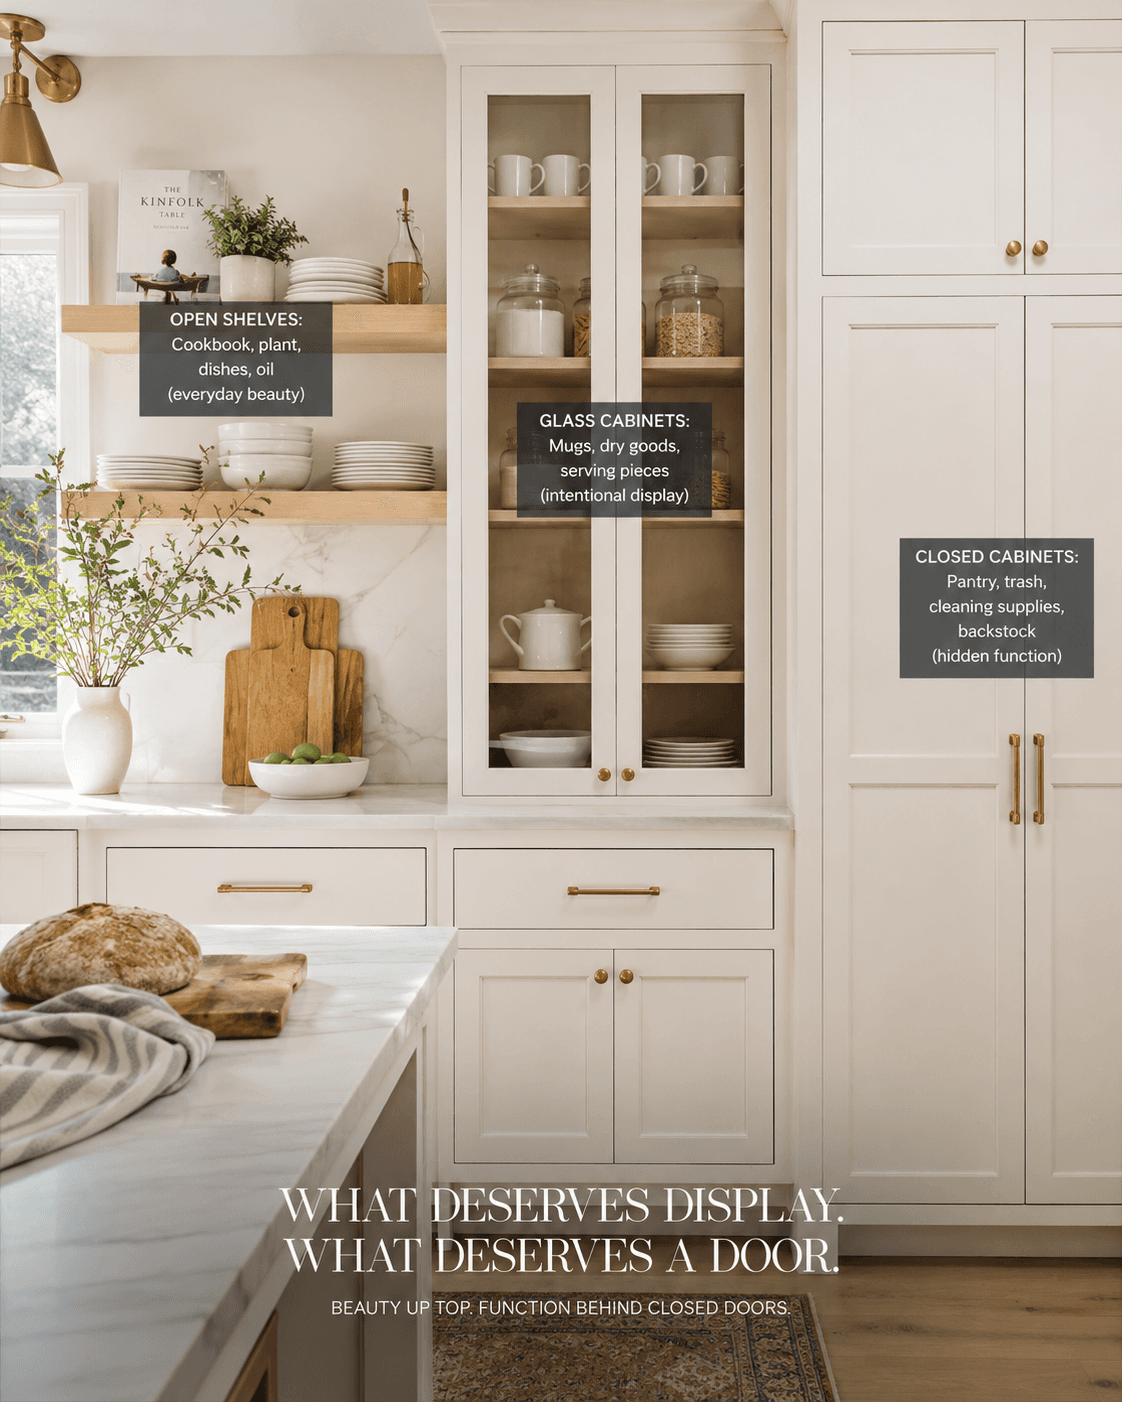
Not everything deserves to be seen. And not everything needs to be hidden. You need a visibility framework.
Behind solid doors (fully hidden):
Anything in packaging you didn't choose (cereal boxes, chip bags, canned goods with loud labels)
Cleaning supplies
Trash and recycling
Appliances you use less than daily
Bulk back stock
Behind glass doors or on semi-open shelves (visible but contained):
Dry goods in matching containers
Cookbooks you actually reference
Mugs and glasses in a cohesive palette
Serving pieces you use monthly
On fully open shelves (always visible):
Daily dishes. Only if they match or coordinate.
Oils and vinegars in nice bottles. Decant if needed.
A plant. One. Maybe two.
A cookbook on a stand, opened to a recipe you might actually make
The rule I use: if it would look fine in a photo taken from 8 feet away, it can be open. If it needs a close-up to look good, put a door in front of it.
And honestly, most of us have way more stuff in the "needs a door" category than we want to admit. Which is fine. Thats what cabinets are for.
---
A Few Things I Would Skip
Matching everything. A full set of 47 identical containers looks incredible for about two weeks. Then you run out of quinoa and have an empty labeled container sitting there judging you. Buy containers in 3 sizes. Fill what you use. Leave room for your storage to breathe.
Decanting everything. Some things belong in their original packaging. Medicine. Anything with dosage instructions. Spice blends with specific recipes on the back. Decant the big-volume stuff, flour, sugar, rice, pasta, and leave the rest alone.
Over-investing in the pantry "reveal." The goal isn't a perfect pantry. The goal is a kitchen that feels calm at 6:47 PM on a Wednesday when you're trying to figure out dinner and the dog is barking. That version of your kitchen is the one worth designing for.
---
Bringing It All Together
Start with the zones. Map your categories to locations based on where you actually cook and eat, not where the builder put the biggest cabinet. Then choose your cabinet features, pull-outs, turntables, appliance garages, based on what each zone needs. Apply the visibility filter. Label what stays visible.
If you want a list to start with:
And if this feels like a lot to sort through on your own, thats because it is. This is layout work, not shopping. The products come after the plan.
Schedule a quick call if you're interested in me building the plan for your kitchen. Ill map the zones, spec the storage, and hand you a list that actually fits your room.
Pantry Cabinets and Built-In Storage: What to Include So Your Kitchen Looks Calm Every Day
*This blog contains affiliate links.
Are open shelves even storage?? I would argue no, they are now ways to create curated decor to show off your style. SO then where do the essentials go?? Lets dig in.
Open shelving became a styling moment. The pantry became a photo op. And somewhere in the middle of all that, the actual stuff, the cereal and the rice and the 4 half-used bags of chocolate chips, lost its home.
I think about kitchen storage the way I used to think about engineering systems. Inputs, outputs, flow. Where does the thing enter the kitchen, where does it get used, and where does it land when you're done. If you answer those three questions for every item category, you don't need a bigger kitchen. You need a smarter one.
---
Shop This Room
Here are the pieces that make this kind of storage actually work day to day:
---
The Cabinet Features That Actually Matter
Not all pantry cabinets are doing the same job. A tall cabinet with fixed shelves is just a closet with better lighting. What makes a pantry cabinet functional is movement. Things that slide, rotate, and reveal.
Pull-out drawers. These are the single biggest upgrade you can make. A 24-inch deep cabinet with fixed shelves means everything behind the front row is forgotten. Pull-outs bring the back row to you. I recommend full-extension pull-out drawers rated for at least 50 pounds. You will load them heavier than you think.
Adjustable shelves. Sounds obvious, and honestly most cabinets technically have them. The issue is that most of us set the shelves once during move-in and never touch them again. Revisit the shelf height every season. Your storage needs shift. That top shelf holding nothing but a cake stand you use twice a year? Move it up 6 inches and you just created room for a whole new row.
Appliance garage. This is the section of counter-depth cabinetry with a retractable or flip-up door that hides your toaster, coffee maker, or stand mixer. The door is the key. If the appliances are sitting on the counter, they become visual clutter. If theyre in a cabinet you have to fully open and lift them out of, you stop using them. The appliance garage with a tambour door is the sweet spot. Open, use, close. Counter stays clean.
Trash and recycling pull-out. I have a strong opinion here. If your trash can is visible, your kitchen will never look calm. Ever. A dual-bin pull-out system tucked into a base cabinet near the sink is one of those invisible upgrades that changes the whole feeling of the room. You stop noticing the absence of mess, which is the point.
---
The Zone Map: Categories to Locations
Here is where layout thinking really kicks in. Instead of organizing your pantry alphabetically or by container size, organize it by activity. Each zone maps to a moment in your day.
Breakfast Zone. Cereal, oats, coffee, tea, mugs, toaster. This zone should be closest to your coffee maker and the counter where you actually eat breakfast. If you eat at the island, the breakfast zone lives in the cabinets nearest the island. Not across the kitchen.
Snack Zone. Granola bars, crackers, dried fruit, kids snacks. This one is interesting because it needs to be accessible, sometimes by shorter humans. Lower drawers or a pull-out at waist height works. Woven baskets are great here because you can pull the whole basket out, set it on the counter, and let everyone grab what they need.
Baking Zone. Flour, sugar, baking soda, vanilla, chocolate chips, mixing bowls, measuring cups. This zone should be near your oven and your largest stretch of counter. Baking spreads out. It needs room. Store dry baking ingredients in airtight square containers because rounds waste shelf depth.
Dinner Zone. Pasta, rice, canned goods, oils, vinegar, spices, sauces. This is usually the biggest zone and the one closest to the stove. A turntable for oils and vinegars means you can spin to find what you need instead of moving 6 bottles to reach the one in the back.
Utility Zone. Wraps, bags, foil, parchment paper, cleaning supplies. These live in a drawer or lower cabinet, ideally near the trash pull-out. A drawer divider set keeps this from becoming the junk zone.
The real trick isn't just grouping things. Its placing the group in the right spot in the room relative to where the action happens. A baking zone next to the fridge and far from the oven is a baking zone you'll fight with every time.
---
This is exactly what I do for clients. Want me to design your room like this?
Check out out Room Systems Plan to get started. Or use our Style Discovery tool first if you're still figuring out your direction.
---
Visibility Rules: What Gets Shown vs. What Gets Hidden
This is the part everyone skips, and its the reason most organized kitchens fall apart within a month.
Not everything deserves to be seen. And not everything needs to be hidden. You need a visibility framework.
Behind solid doors (fully hidden):
Anything in packaging you didn't choose (cereal boxes, chip bags, canned goods with loud labels)
Cleaning supplies
Trash and recycling
Appliances you use less than daily
Bulk back stock
Behind glass doors or on semi-open shelves (visible but contained):
Dry goods in matching containers
Cookbooks you actually reference
Mugs and glasses in a cohesive palette
Serving pieces you use monthly
On fully open shelves (always visible):
Daily dishes. Only if they match or coordinate.
Oils and vinegars in nice bottles. Decant if needed.
A plant. One. Maybe two.
A cookbook on a stand, opened to a recipe you might actually make
The rule I use: if it would look fine in a photo taken from 8 feet away, it can be open. If it needs a close-up to look good, put a door in front of it.
And honestly, most of us have way more stuff in the "needs a door" category than we want to admit. Which is fine. Thats what cabinets are for.
---
A Few Things I Would Skip
Matching everything. A full set of 47 identical containers looks incredible for about two weeks. Then you run out of quinoa and have an empty labeled container sitting there judging you. Buy containers in 3 sizes. Fill what you use. Leave room for your storage to breathe.
Decanting everything. Some things belong in their original packaging. Medicine. Anything with dosage instructions. Spice blends with specific recipes on the back. Decant the big-volume stuff, flour, sugar, rice, pasta, and leave the rest alone.
Over-investing in the pantry "reveal." The goal isn't a perfect pantry. The goal is a kitchen that feels calm at 6:47 PM on a Wednesday when you're trying to figure out dinner and the dog is barking. That version of your kitchen is the one worth designing for.
---
Bringing It All Together
Start with the zones. Map your categories to locations based on where you actually cook and eat, not where the builder put the biggest cabinet. Then choose your cabinet features, pull-outs, turntables, appliance garages, based on what each zone needs. Apply the visibility filter. Label what stays visible.
If you want a list to start with:
And if this feels like a lot to sort through on your own, thats because it is. This is layout work, not shopping. The products come after the plan.
Schedule a quick call if you're interested in me building the plan for your kitchen. Ill map the zones, spec the storage, and hand you a list that actually fits your room.
Other Blogs
Other Similar Blogs
Your go-to destination for insightful articles, tips, and inspiration on all things landscaping and outdoor living
Other Blogs
Other Similar Blogs
Your go-to destination for insightful articles, tips, and inspiration on all things landscaping and outdoor living
Other Blogs
Other Similar Blogs
Your go-to destination for insightful articles, tips, and inspiration on all things landscaping and outdoor living
Join our newsletter list
Sign up to get the most recent blog articles in your email every week.